
I haven’t been writing in ages, but I have not forgotten about the blog.
Recently I made the switch and bought an Olympus E-M1 Mark II, since I loved the Mark I. Not because I needed to upgrade, but because I wanted to (GAS got the better of me).
One of the things that I liked about the E-M5 Mark II, which I had hoped to have in the E-M1 Mark II, was the high resolution mode. For those of you who don’t know: Olympus takes 8 pictures by moving the sensor with the In-Body Image Stabiliser (IBIS) by tiny bits and then merging it together into one huge image (50 Megapixel JPG, or if you convert the RAW, it gives you a whopping 80 Megapixel).
I have shot this in RAW (it automatically saves a JPEG as well) and will be showing you both, the converted RAW and the in-camera created JPEG.
If you wish to see them, just scroll down. First I would like to talk about the small pitfalls I encountered while taking these.
Shooting RAW, yes, I really want to shoot RAW (what the…)
After I get a new camera (or, before the latest version of the Olympus updater, after each update of the firmware) I set the camera up.
One of the first things is: Setting the captured files to RAW, because I like to develop the images in Lightroom myself. Now you switch to the silent mode, the burst mode low, burst mode high (60 fps, wheew) and everything neatly is captured in RAW. Switch one further to the High-Res mode: JPEG. So you actually have to change this separately for the High-Res mode. Not a big issue, but you’ve got to know it. First time I used it, I came home and wondered why there were no RAW files available for these images, until I realized why.
You can shoot High-Res images with flash, but…
…there are certain restrictions.
For example: I usually shoot products and portraits with at least one off-camera flash (YN-560 III), triggered by a radio remote trigger (YN-560 TX). Works fine, until you use either the silent shutter or the High-Res mode. Nothing. With the electronic (silent) shutter, for some reason, Olympus does not want you to use flashes.
There is one exception though: If you use the small flash that the E-M1 II comes with, you can enable manual flash for the High-Res mode.
So if I leave out the radio trigger and instead use the supplied flash by Olympus, using the optical slave mode of my YN-560 flashes, I can actually utilize flashes during High-Res mode. I have to wonder though why Olympus went through the trouble of making it so difficult, when they even conveniently put in settings for adjusting the flash charging time between each shot of the High-Res mode.


Also there are a few more limitations that apply during the High-Res mode. The ISO is limited to 3200, the flash sync speed is a mere 1/20th of a second (which is due to the electronic shutter being used) and the smallest aperture is f8, which isn’t ideal for close-up product shots. If you were thinking to combine High-Res shot with focus bracketing, this is not possible. Any form of bracketing and the High-Res mode are mutually exclusive.
Keep in mind: Because of the smallest aperture of f8 and the 1/20th sync speed, environmental light is an issue. You have to make it quite dark to avoid light spill.
Talking about the plus sides: When you have non-moving objects – or landscapes with barely any movement (except maybe a river or slight movement of leaves – which the E-M1 Mark II copes with a lot better than the E-M5 Mark II), you get exceptionally detailed images, well worth the effort in my opinion.
Now let’s finally get to the images!
I had this snowman figure hiding around in a corner for a long time, hence the webs. I left them, because I felt it could add some more detail, especially in the High-Res mode. And it did. For the setup I used one Yongnuo YN-560 III from the front left at 24mm zoom set to 1/64 power. I had a second Yongnuo YN-560 about three times as far from the right at the back shooting at 105mm zoom set to 1/32 power. Then I used the 12-40mm f2.8 lens on the E-M1 Mark II (which of course was on a tripod) at f8 with ISO 200. I set a 2 seconds shutter delay, 1 second interval between each image and used the FL-LM3 (tiny Olympus bundled flash) for triggering both the flashes in S1 mode.
The 20 Megapixel image came out of Lightroom, without sharpening or denoising, but was developed from the RAW file. The 50 Megapixel image came straight out of the camera and was thus processed entirely within the camera. The 80 Megapixel image was developed with Olympus Viewer 3 (because Lightroom currently lacks High-Res support, it can’t open the files), although developed is not the right choice of words. I have merely exported it (which took 45 seconds, on a Mac Pro, 6-core Xeon, 64 GB RAM), a painfully slow process.
Without further ado:

20 Megapixel single exposure (from RAW)

50 Megapixel High-Res image (in-camera JPEG)

80 Megapixel High-Res image (from RAW)
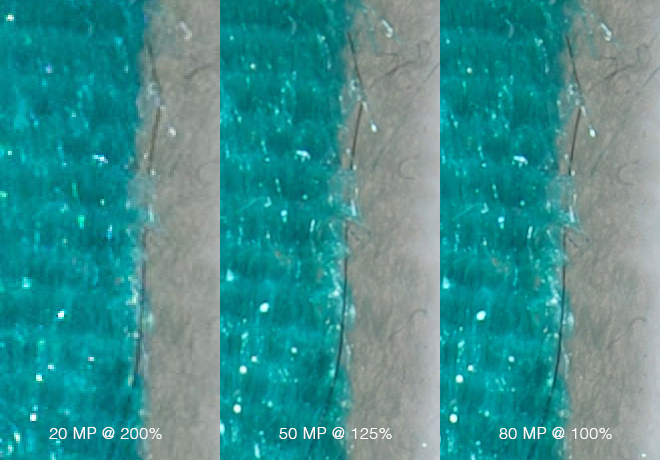
Now to compare the gain in detail between the different resolutions, I tried to normalize them to the 80 MP image in the following picture. I have zoomed them up to match the 80 MP version, to see how big the gain in detail really is, so you can decide for yourself whether it is worth the extra effort or not.
Final words
I am quite impressed by the amount of detail you can get out of this technique. I think the difference between 50 MP and 80 MP is small but noticable, it can under certain circumstances be worth it. However, the difference between the standard 20 MP image and the 50 MP image is as clear as day. You have much more detail, the resolution is well worth it, if your situation allows for it.
Do make sure to set an initial delay, because the default is no delay and this ruined a lot of pictures for me at first. I hope you enjoyed this.
Update:
It seems that Olympus admitted not being able to use any other flashes besides Olympus flashes for High Res mode is a bug which they are working on. I haven’t gotten an official confirmation of this, but if the situation changes, I will update the article again.
Further links
If you need more reading material about the E-M1 Mark II, its capabilities, specs and other information, please check the following links:
- Robin Wong’s real life review & review extension covering the high-res mode
- dpreview for a technical review
- Details about long exposure capabilities of the E-M1 Mark II (compared to E-M1 and E-M5 Mark II)
- Facebook group for E-M1 Mark II
Equipment used:
- Olympus E-M1 Mark II + Olympus FL-LM3
- Olympus 12-40mm f2.8
- 2x Yongnuo YN 560 III
- Manfrotto BeFree Stativ
The links contain an affiliate code, so if you use them to buy something, you are supporting my blog. Any support is very much appreciated.